With an app becoming bigger in terms of people working on them as well as adding more features, the question arises of how to organize the growing complexity. Imagine multiple features that need to be implemented simultaneously by different teams. Ideally, every team's work is not interfering with the work of other teams such that your app can still deliver other features independently. Here microfeatures come into play. Microfeatures are a way of structuring your inner app dependencies in a way to achieve exactly that.
In the following, I want to go over the fundamentals of this approach as well as showcase how to set up your Xcode project with microfeatures.
What are Microfeatures?
Imagine an app that lets you order food from local restaurants to your home. For such an app you will need to have some form of authentication, user management, a search function and an order process - 4 features in total. The idea behind microfeatures is to separate these small features of your app and hide implementation details behind interfaces to foster the "Dependency Inversion Principle". You can think of microfeatures as small building blocks. Each block serves a very specific purpose and by combining them together we can build a real application with a lot of interconnected features.
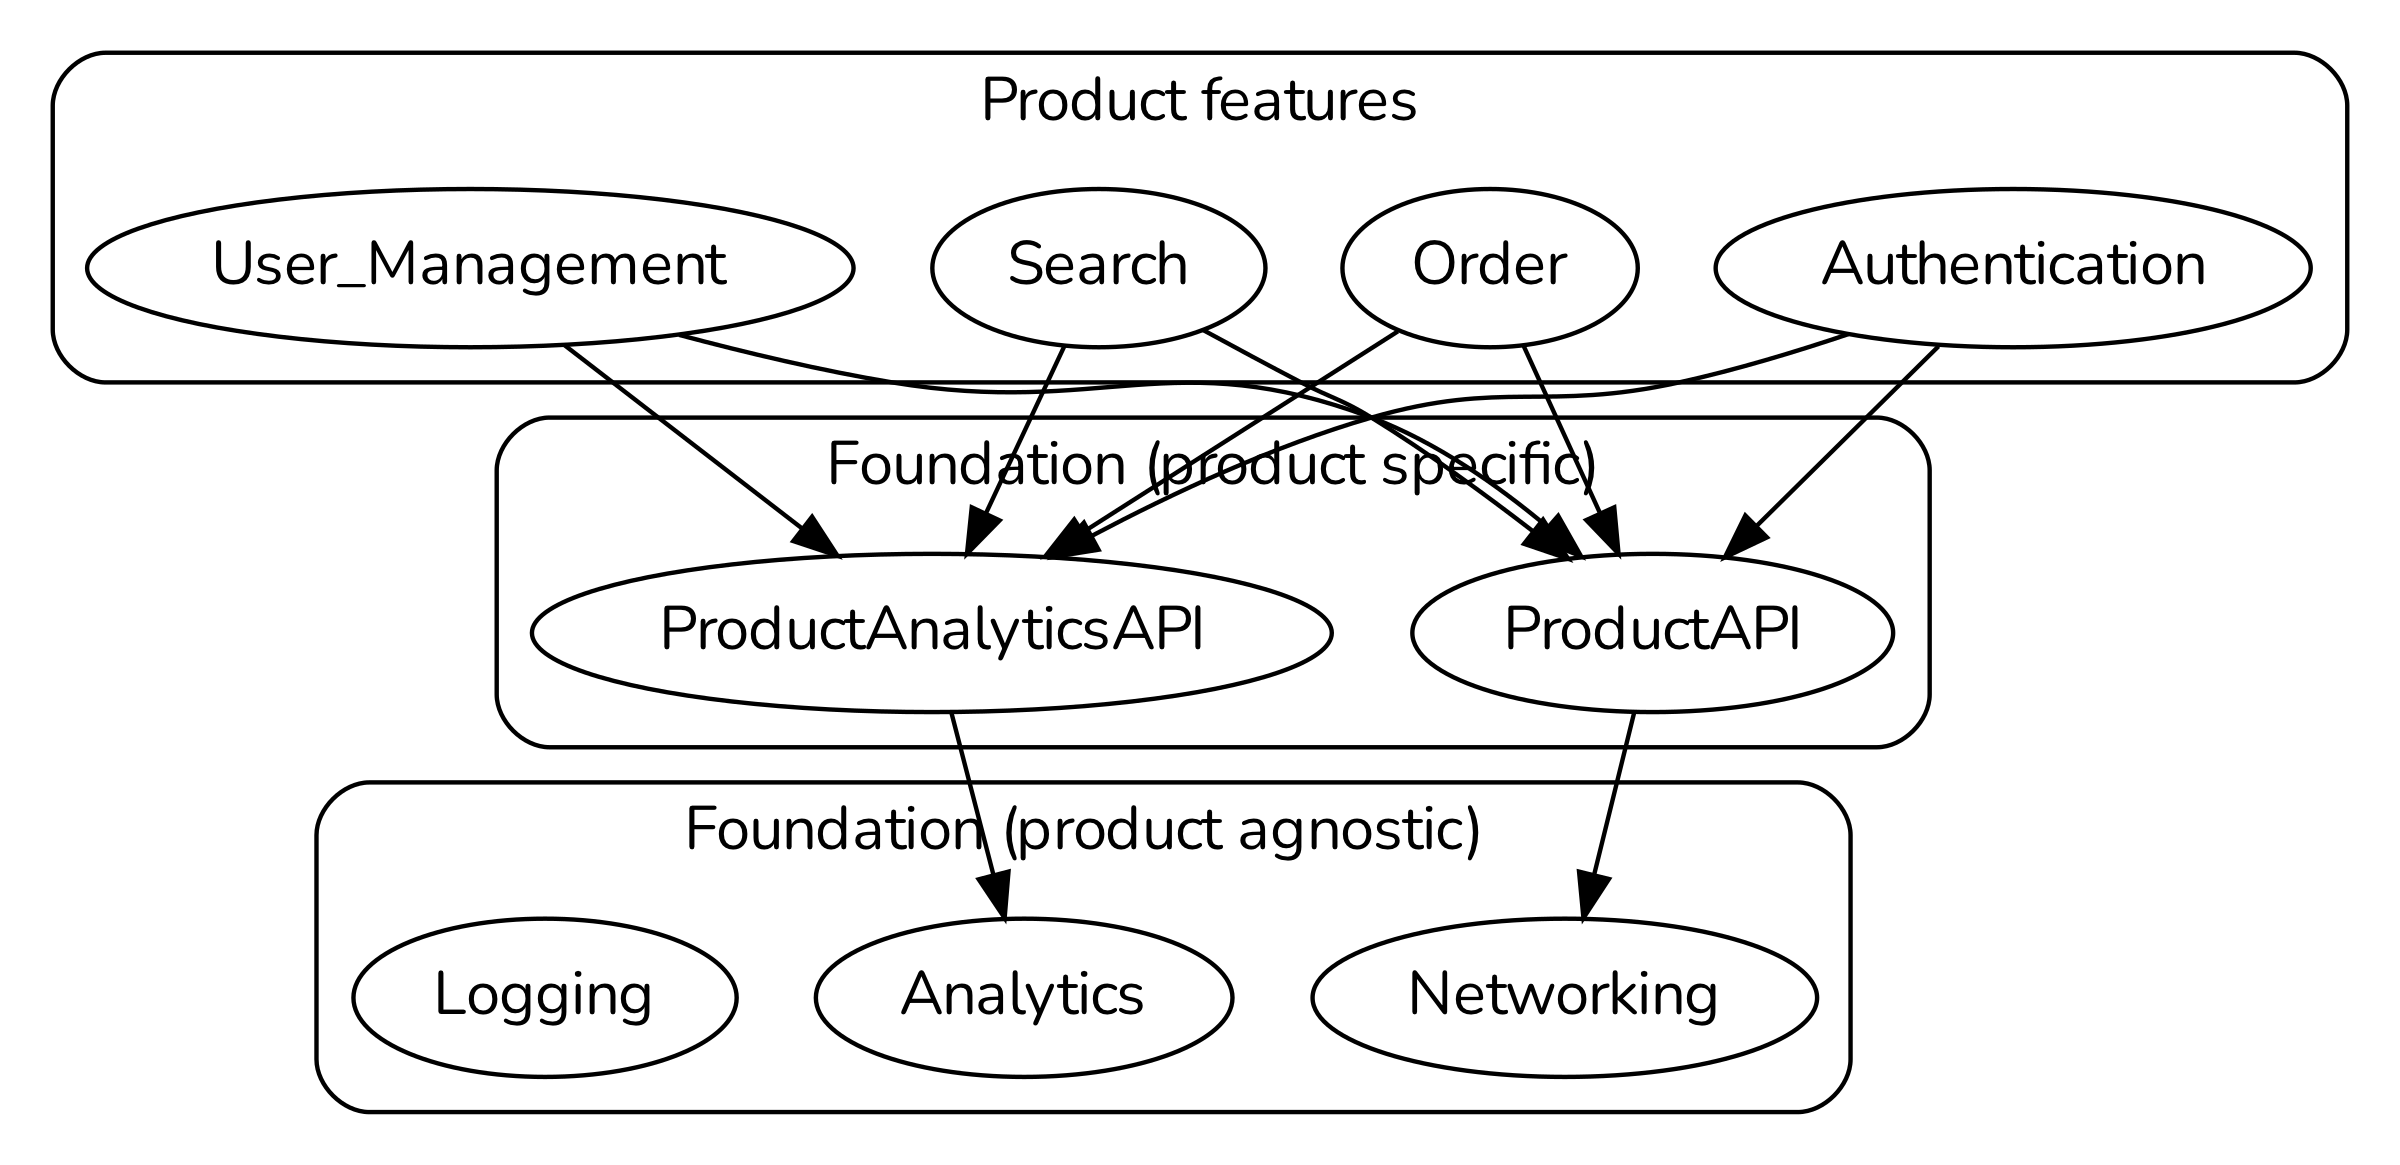
A difficult question that will probably arise in teams: What exactly is a microfeature - where to draw the line between the features? From my experience, this question can only be solved by clear communication within the team. Often it is a case-by-case decision what exactly a feature is. What I have seen though is, that there can be three different kinds of features. Foundational app agnostic, foundational app specific and product features.
- Foundational app agnostic features are not directly app relevant and are often things like networking, analytics, logging etc. These features can potentially be part of any application.
- Foundational app specific features are building upon the app agnostic building blocks to form modules that are foundational to your app. E.g. an API service that builds upon a generic networking layer or a UI component target that can be shared across product features.
- Product features build the core value of your app. As we saw above these can be the authentication of users or the order process for food when building a food delivery app. Each product feature can additionally be showcased by an example app independently from the whole app.
Microfeature structure
As seen previously there are three types of features. The structure within these is very similar and they should expose a different kind of targets that can be consumed by other features. Each item in the following list can later be translated into an Xcode target definition.
Foundational features can be trimmed a little bit because they do not need to offer an example app which showcases the feature:
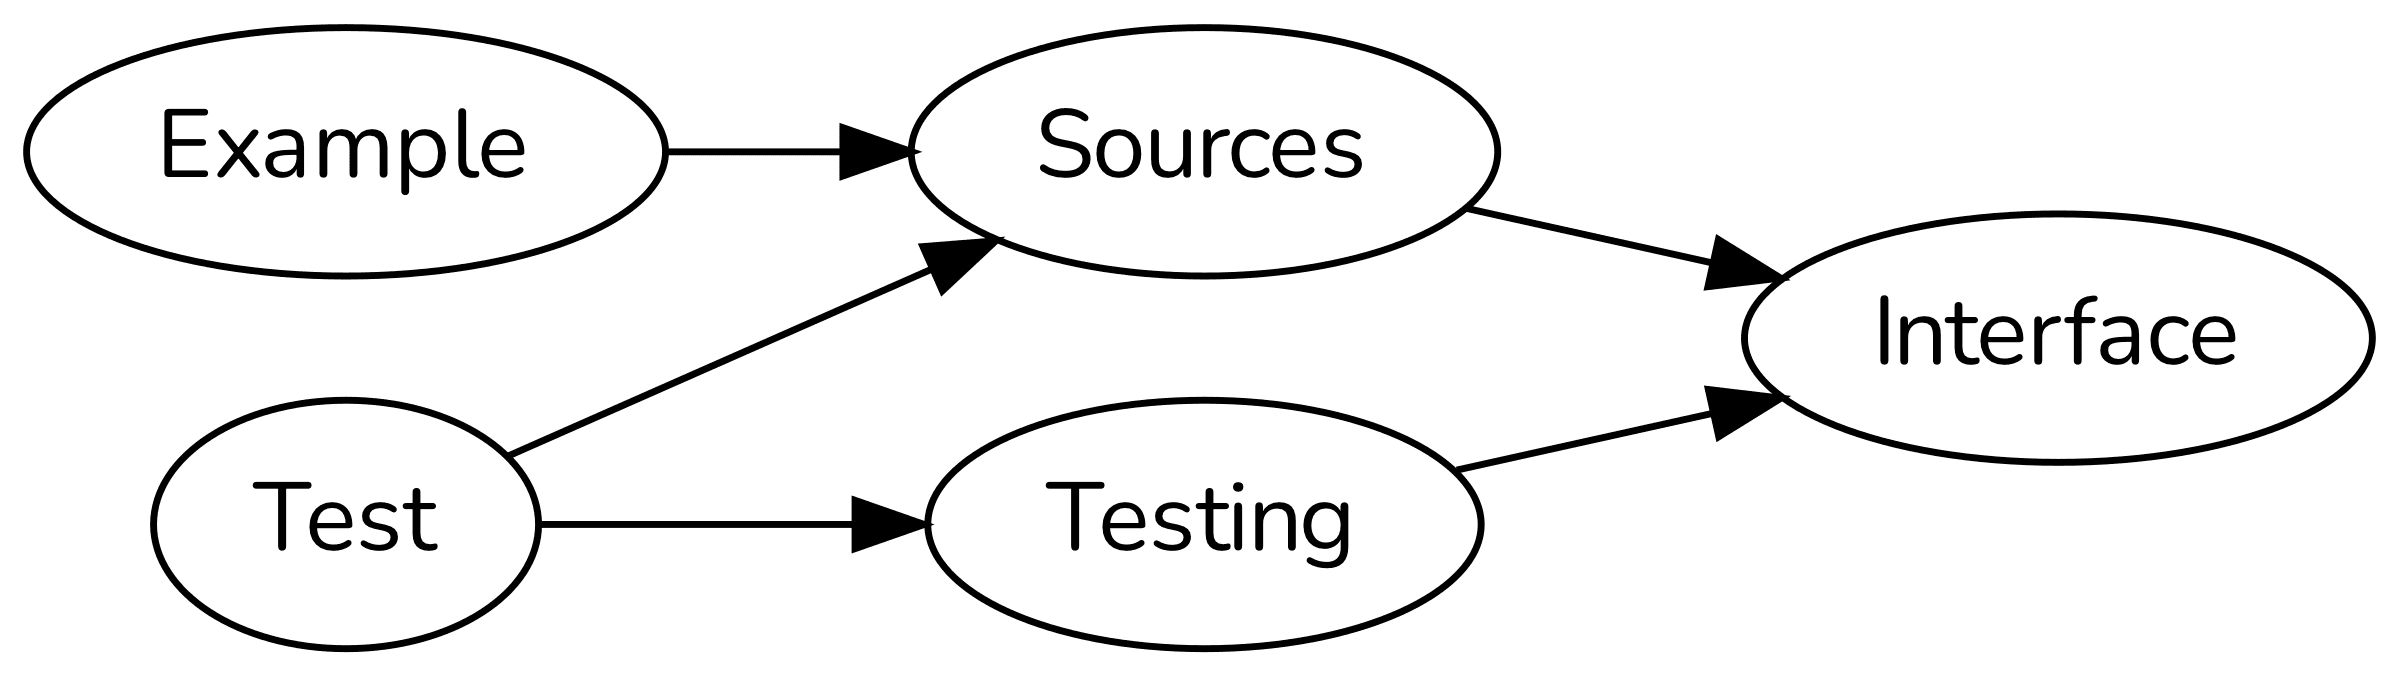
Each foundation feature consists of 4 different parts:
- Sources: Source code of the implementation of the feature. Should not be consumed by other features.
- Interface: Interfaces and data model of the feature which can be consumed by other features
- Tests: Unit and integration tests of the feature
- Testing: Mocks and other helpers to test the feature
Each product feature consists of 5 different parts:
- Sources: Source code of the implementation of the feature. Should not be consumed by other features.
- Interface: Interfaces and data model of the feature which can be consumed by other features
- Examples: Example application that showcases the feature in a real world environment
- Tests: Unit and integration tests of the feature
- Testing: Mocks and other helpers to test the feature
The inner feature target dependency, in the end, looks like the following:
Microfeature goals
Before we dive into applying microfeatures, I want to highlight some problems that can be solved with microfeatures. But first a disclaimer. Microfeatures are not a silver bullet. It can be that they solve all problems for one app but totally not working on another one. Before going all in, always evaluate whether the architecture proposal really solves your issues and discuss different options in your team.
The aim of microfeatures is to build a horizontal dependency structure across features. No feature depends on the concrete implementation details of another one. It just depends on the interfaces of others. This will result in loosely coupled dependencies following the SOLID principles. Additionally, this can reduce build times since interfaces are less likely to be changed than implementations and caches can be built upon this.
Another big benefit for large teams is, that the individual feature teams can work independently from each other. Once an interface of module A has been defined, all teams who depend on module A can consume the interface without waiting on the implementation of module A, leading to a higher velocity of the teams and the overall product development speed can be increased.
Apply Microfeature architecture
After laying out all the theoretical information about the microfeature architecture it's time to actually see how we can apply it.
At first, we have to decide on one fundamental question. Should each feature be its own Xcode project or should we just put everything into one project? Both options are totally valid and possible to implement. For this article, I will go with one project for each feature wrapping all of them into an Xcode workspace. This highlights the independency of each feature a little bit better as well as fosters the idea that different teams can work on different projects independently.
We are going to use the following directory structure for applying the microfeature idea. The structure is very opinionated and should not be taken for granted. If the structure does not fit your needs, feel free to change it. It should just highlight the idea of the architectural approach for now.
Project Directory structure
.
├── App
│   └── iOS (Xcode project)
└── Features
    ├── <product_specific_feature> (Xcode project)
    └── Foundation
		├── <foundational_feature> (Xcode project)
        ├── <foundational_feature> (Xcode project)
	 	└── Core
			└── <foundational__product_agnostic_feature> (Xcode project)
The app directory contains "executable" targets, e.g. an iOS or a macOS application. The feature directory contains our different products and foundational features.
Setup Xcode workspace
For the set-up of the .xcworkspace file, I will use a CLI tool called tuist. On a very high level, it is a tool which generates Xcode projects and workspaces out of manifest file definitions written in Swift. It is also totally possible to create the structure we want to have manually, but with tuist it is much faster. I highly recommend checking out their documentation. Even if you never used the tool before, I hope you can follow along.
Since we are using multiple projects, we want to create a .xcworkspace. tuist is using a file called Workspace.swift to describe an Xcode workspace. In our example, the main purpose is to declare which projects to include in the final workspace. I will pick up the example food app idea from the beginning and define three foundational and two product features.
import ProjectDescription
import ProjectDescriptionHelpers

let workspace = Workspace(
    name: "Microfeature Example",
    projects: [
        "App/iOS",
        "Features/Order",
        "Features/Search",
        "Features/Foundation/ProductAPI",
        "Features/Foundation/Core/Networking",
		"Features/Foundation/Core/DependencyInjection"
    ],
    schemes: [],
    additionalFiles: [
        "README.md"
    ]
)
Next up we define a Project.swift file for each feature of the application. Since they all follow the same idea, I just show an example manifest file here.
The Project.swift file describes a single .xcodeproj file. In it, you can configure a single Xcode project. In the example shown below only the relevant microfeature targets are highlighted. The Project struct offers a lot more properties, but most of them are unnecessary in the current context.
import ProjectDescription
import ProjectDescriptionHelpers

let projectName = "Order"
let moduleBaseId = "\(workspaceBaseId).order"

let project = Project(
	name: projectName,
	targets: [
		Target(
			name: projectName,
			platform: .iOS,
			product: .framework,
			bundleId: moduleBaseId,
			infoPlist: .default,
			sources: ["Sources/**"],
			dependencies: [
				.target(name: "\(projectName)Interface"),
				.project(target: "ProductAPIInterface", path: .relativeToRoot("Features/Foundation/ProductAPI"))
			]
		),
		Target(
			name: "\(projectName)Interface",
			platform: .iOS,
			product: .framework,
			bundleId: "\(moduleBaseId).interface",
			infoPlist: .default,
			sources: ["Interface/**"],
			dependencies: []
		),
		Target(
			name: "\(projectName)Tests",
			platform: .iOS,
			product: .unitTests,
			bundleId: "\(moduleBaseId).tests",
			infoPlist: .default,
			sources: ["Tests/**/*.swift"],
			dependencies: [
				.target(name: projectName),
				.xctest
			]
		),
		Target(
			name: "\(projectName)Example",
			platform: .iOS,
			product: .app,
			bundleId: "\(moduleBaseId).example",
			infoPlist: .fixedInfoPlist,
			sources: ["Example/Sources/**/*.swift"],
			resources: ["Example/Resources/**/*"],
			dependencies: [
				.target(name: projectName)
			]
		),
	],
	schemes: [],
	additionalFiles: [
		"README.md"
	]
)
The Project.swift file is defined for every feature of our app as well as the main iOS target. Through them, we link our different features together such that they form our dependency graph.
To give you a more visual representation of what we actually define with all of these manifest files, have a look at the following graph, which shows dependencies between the targets of our app.
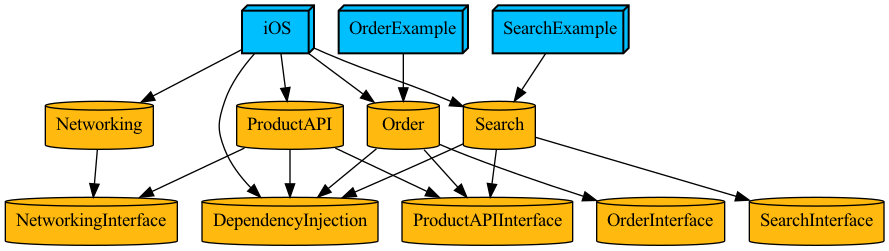
It can be seen, that no implementation (Sources) target depends on other implementations. Every feature just depends on interfaces and not concrete implementation, following our claim of fulfilling the "Dependency Inversion Principle". The only place where real implementation targets are referenced is the iOS app. It should be the only place among all targets which knows every dependency and every implementation of it. This fact can be utilized to inject real implementations into the different features. Inside my example implementation on GitHub I used a package called Resolver to make dependency injection easier. Of course, you are not forced to use this package. You can use whatever solution you prefer. The thing I want to highlight here is, that the app target is the place where everything comes together and implementations of the different protocols are injected into the different features modules.
Conclusion
In this article, we have seen what microfeatures are and how they can improve the overall working on a big application. Of course it is not a silver bullet for every team, but it could be for some. By having clear and strict contracts (interfaces) between the different modules in an app, we can create independent building blocks that foster clear responsibilities, reduction of build times and good developer practices for high-velocity development in big developer teams.
I am by far not the only one talking about the microfeature and modularized iOS app concept. There are a lot resources out there which provide a lot of valuable information as well. Go ahead and check them out (non-exhaustive list):
- https://docs.tuist.io/building-at-scale/microfeatures
- https://swiftrocks.com/reducing-ios-build-times-by-using-interface-targets
- https://speakerdeck.com/pepibumur/developing-modular-apps-on-ios
- https://nslondon.com/#bruno-bilescky-scaling-your-app
Hope to see you next time! 👋