In the last part part we were using VisionKit to accurately recognize text on captured images. In this part we will bring everything together and create a searchable PDF by combining the image and recognized texts. Lets recap what is needed and what is already done:
Part 1✅Foundations✅Scan the document✅
Part 2Recognize the text on scanned images✅
- Part 3
- Create a PDF with the images
- Place the recognized text behind each image on the PDF
- Save and display the PDF
Create a PDF
Before we start right into coding I want to highlight what actually a searchable PDF is. It is a combination of a text and image layer where the textual layer is placed behind the image. The position of the text characters should be in the exact same position as the character is placed on the image. This in the end leads to the fact that you can select the text behind the image and it looks like you would select the text which is shown on the image. I think the following image visualizes this concept very well:
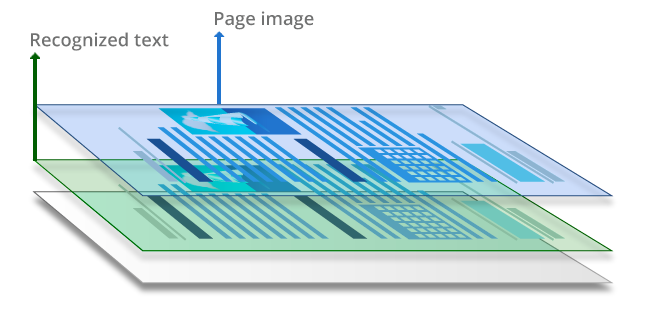
Image Credit: https://pdf.abbyy.com/learning-center/pdf-types/
Last time we stopped with the PDFCreator class and a method signature that will take an array of UIImage and returns Data which can be used to create a PDF out of it.
class PDFCreator {
  //...

  func createSearchablePDF(from images: [UIImage]) -> Data {
    // fill out
  }
}
Let us continue by implementing the createSearchablePDF(from:) method. The first step is to invoke the pdfData method on an UIGraphicsPDFRenderer instance. This method is responsible for creating the raw data that can later be used as the return type of our method. Next up we keep a reference to the underlying core graphics context. This can be used to draw things on the PDF. We will use it for drawing our scanned UIImages and the recognized text onto the PDF.
func createSearchablePDF(from images: [UIImage]) -> Data {
    // Start creating the PDF data
    let data = UIGraphicsPDFRenderer().pdfData { (context) in

        // Grab the raw core graphics context
        let drawContext = context.cgContext

        ...
    }

    return data
}
Drawing image and text
Having the base setup for the method, we can start iterating over the images we scanned in part 2. The workflow for processing a single image will be the following:
- Take the image
- Recognize the text on the image
- Create a PDF page with the dimensions of the image
- Use the recognized text to draw text
- Draw the image above the text on the pdf
Having everything in place, let's start with the actual implementation of the method.
func createSearchablePDF(from images: [UIImage]) -> Data {
    ...

    // Iterate over the images
    images.forEach { image in

        // 1. Get the underlying Quartz image data, used to recognize the text
        guard let cgImage = image.cgImage else {
            return
        }

        // 2. Recognize the text on the image
        let recognizedText: [VNRecognizedText] = self.recognizeText(from: cgImage)

        // 3. Calculate the size of the PDF page we are going to create
        let pageWidth = image.size.width
        let pageHeight = image.size.height
        let pageRect = CGRect(x: 0, y: 0, width: pageWidth, height: pageHeight)

        // 3. Initialize a PDF page
        context.beginPage(withBounds: pageRect, pageInfo: [:])

         // 4. Iterate over the lines of recognized text in order to write the text layer of the PDF
        recognizedText.forEach { text in
            self.writeTextOnTextBoxLevel(recognizedText: $0, on: drawContext, bounds: pageRect)
        }

        // 5. Draw the image on the PDF page
        self.draw(image: $0, on: drawContext, withSize: pageRect)
    }
As you may have already seen, we are using two methods here that we did not yet define - writeTextOnTextBoxLevel(recognizedText:on:bounds) and draw(image:on:withSize). We will have a more detailed look on these now.
Drawing the text
Drawing text on the PDF page is a little bit tricky in this context. We need to exactly know where to draw the text as well as choosing a font size which tries to match the original font size as close as possible in order to "simulate" the selection of the text on the image in the end.
Thanks to the VNRecognizedText we already have the information about where the text was recognized on the images. Furthermore we get the exact bounding boxes of each recognized line of text. Now the task is to find a size for the system font which tries to fit exactly into this bounding box. For that purpose we will utilise a binary search algorithm from the FittableFontLabel package. This implementation gave me the best results in terms of matching font sizes. I only did some small modifications in order to make it fit into the current context, but all credit here goes to Tom Barens and his awesome library.
Like we did it with the PDFCreator class, the FontSizeCalculator is implemented as a singleton and exposes a single public method called fontSizeThatFits(text:maxFontSize:minFontScale:rectSize) which calculates the best matching font size for a given boundary. I do not want to go into further detail here, since the purpose of the series is to find out how to create a searchable PDF and not how to implement a binary search for a font size.
// Credits: https://github.com/tbaranes/FittableFontLabel/blob/master/Source/UILabelExtension.swift
public class FontSizeCalculator {

    static var shared: FontSizeCalculator = FontSizeCalculator()

    private enum FontSizeState {
        case fit, tooBig, tooSmall
    }

    /**
     Returns a font size of a specific string in a specific font that fits a specific size
     - parameter text:         The text to use
     - parameter maxFontSize:  The max font size available
     - parameter minFontScale: The min font scale that the font will have
     - parameter rectSize:     Rect size where the label must fit
     */
    public func fontSizeThatFits(text string: String, maxFontSize: CGFloat = 100, minFontScale: CGFloat = 0.1, rectSize: CGSize) -> CGFloat {

        let font = UIFont.systemFont(ofSize: 10)


        let maxFontSize = maxFontSize.isNaN ? 100 : maxFontSize
        let minFontScale = minFontScale.isNaN ? 0.1 : minFontScale
        let minimumFontSize = maxFontSize * minFontScale
        guard !string.isEmpty else {
            return font.pointSize
        }

        let constraintSize =  CGSize(width: CGFloat.greatestFiniteMagnitude, height: rectSize.height)
        let calculatedFontSize = binarySearch(font: font, string: string, minSize: minimumFontSize, maxSize: maxFontSize, size: rectSize, constraintSize: constraintSize)
        return (calculatedFontSize * 10.0).rounded(.down) / 10.0
    }

    private func binarySearch(font: UIFont, string: String, minSize: CGFloat, maxSize: CGFloat, size: CGSize, constraintSize: CGSize) -> CGFloat {
        let fontSize = (minSize + maxSize) / 2
        var attributes: [NSAttributedString.Key: Any] = [:]
        attributes[NSAttributedString.Key.font] = font.withSize(fontSize)

        let rect = string.boundingRect(with: constraintSize, options: .usesLineFragmentOrigin, attributes: attributes, context: nil)
        let state = singleLineSizeState(rect: rect, size: size)

        // if the search range is smaller than 0.1 of a font size we stop
        // returning either side of min or max depending on the state
        let diff = maxSize - minSize
        guard diff > 0.1 else {
            switch state {
            case .tooSmall:
                return maxSize
            default:
                return minSize
            }
        }

        switch state {
        case .fit: return fontSize
        case .tooBig: return binarySearch(font: font, string: string, minSize: minSize, maxSize: fontSize, size: size, constraintSize: constraintSize)
        case .tooSmall: return binarySearch(font: font, string: string, minSize: fontSize, maxSize: maxSize, size: size, constraintSize: constraintSize)
        }
    }

    private func singleLineSizeState(rect: CGRect, size: CGSize) -> FontSizeState {
        if rect.width >= size.width + 10 && rect.width <= size.width {
            return .fit
        } else if rect.width > size.width {
            return .tooBig
        } else {
            return .tooSmall
        }
    }
}
Having the font size calculation in place we can start to implement the writeTextOnTextBoxLevel(recognizedText:on:bounds) method. Like with the createSearchablePDF(from:) method, I want to provide a high level overview about what has to be done within the method:
- Get the bounding box of the recognized text
- Translate the bounding coordinates to image coordinates
- Calculate the best matching font size
- Prepare an
NSAttributedStringwith the recognized text and font size - Draw the string inside the transformed bounding coordinates
Having our plan we can start with the implementation of the method.
 private func writeTextOnTextBoxLevel(recognizedText: VNRecognizedText, on cgContext: CGContext, bounds: CGRect) {

        // 0. Save some meta data information
        let text = recognizedText.string
        let pageWidth = bounds.size.width
        let pageHeight = bounds.size.height

        // 1. Calculate the bounding box of the recognized text
        let start = text.index(text.startIndex, offsetBy: 0)
        let end = text.index(text.endIndex, offsetBy: 0)
        let bBox = try? recognizedText.boundingBox(for: start..<end)

        guard let boundingBox = bBox else {
            return
        }

        // 2. Transform the bounding box from the processed image to the origin image
        // The coordinates are normalized to the dimensions of the processed image, with the origin at the image's lower-left corner.
        let transform = CGAffineTransform(scaleX: 1, y: -1).translatedBy(x: 0, y: -pageHeight)
        let rect: CGRect = VNImageRectForNormalizedRect(boundingBox.boundingBox, Int(pageWidth), Int(pageHeight))
            .applying(transform)

        // 3. Calculate the best matching font size
        let fontSize = FontSizeCalculator.shared.fontSizeThatFits(text: text, rectSize: rect.size)
        let font = UIFont.systemFont(ofSize: fontSize)

        //4. Create and prepare an NSAttributedString
        let attributedString = NSAttributedString(
            string: text,
            attributes:  [
                NSAttributedString.Key.font: font
            ]
        )

        // 5. Draw the attributed string in the transformed rect
        attributedString.draw(in: rect)
    }
This is the full implementation of drawing text based on the complete text box level of the recognized text. You can also draw each individual character on the PDF but in my tests this gave me worse results than just draw the whole line of recognized text.
Drawing the image
In contrast to drawing the text, drawing an image is rather simple. The only thing necessary is to call the draw method of UIImage. Please keep in mind that you do not need to provide the CGContext variable per se. It is just to demonstrate that the draw method of UIImage is always executed within the current graphics context.
private func draw(image: UIImage, on cgContext: CGContext, withSize: CGRect) {
    // Draws the image in the current graphics context
    image.draw(in: withSize)
}
Creating the actual PDF
The last step which is missing, is to convert the raw Data into an actual PDF file. For that we take the returned Data instance from createSearchablePDF(from:) and initialize a PDFDocument instance. If this is successful, you can do whatever you want with the PDF, for example saving it to the documents directory of the user.
func documentCameraViewController(_: VNDocumentCameraViewController, didFinishWith scan: VNDocumentCameraScan) {
    let images = (0..<scan.pageCount).map {scan.imageOfPage(at: $0)}
    let data = PDFCreator
        .shared
        .createSearchablePDF(from: images)

    if let pdfDocument = PDFDocument(data: data) {
        FileHandler.shared.save(pdf: pdfDocument, fileName: "scanned_pdf\(Date())")
    }

    parent.isPresented.toggle()
}
Conclusion
That was quite a lot of code today but in the end we managed to finish up a working example of creating a searchable PDF of scanned documents. I hope you found this rather longly series interesting. It was the first time I wrote a series of connected posts about a more complex topic - there are for sure some places where I could improve my writing here. If you have suggestions or question please don't hesitate to reach out to me !
See you next time 👋